Tri-R Technologies
TR-4
BUILDER'S
MANUAL
This Builder's Manual is NOT the official manual
as published by TRI-R Technologies.
FLAPS
ASSEMBLY
Quick Links to Aileron Assembly
Sub-Sections:
PARTS IDENTIFICATION
& SETUP
BUILD UP THE LOWER SKIN
ASSEMBLY
SPAR
LOWER ASSEMBLY
FLAP ACTUATOR
TRACK
PREPARE AND BOND TOP
SKIN
MOUNT HINGES
PARTS
IDENTIFICATION & SETUP
-
Identify the major portions of the flap parts from your kit, and prepare
them by removing all peel ply and other debris. The primary flap components
are the top (C-20TR & C-20TL) and bottom skins (C-20BR & C-20BL)
for each side.
-
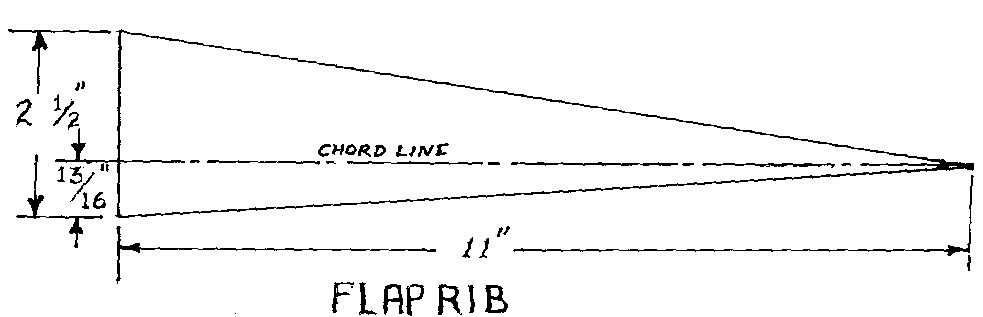
The rib patterns are marked on one of the drawings supplied with the kit.
Since the flap is hinged from the bottom, the top skin will have the curved
surface on the front section, and the bottom panel will be flat. The left
and right flaps are mirror images of each other - exactly alike - but reversed.
Sketches, figures and these instructions will be for the right flap, with
the left flap identical but reversed.
BUILD UP THE
LOWER SKIN ASSEMBLY
Prepare a flat surface to build the flap on, the wing jig table would be
excellent for this. A twist in this component would lead to severe flight
performance degradation, so make sure the table is not twisted by checking
with a level.
-
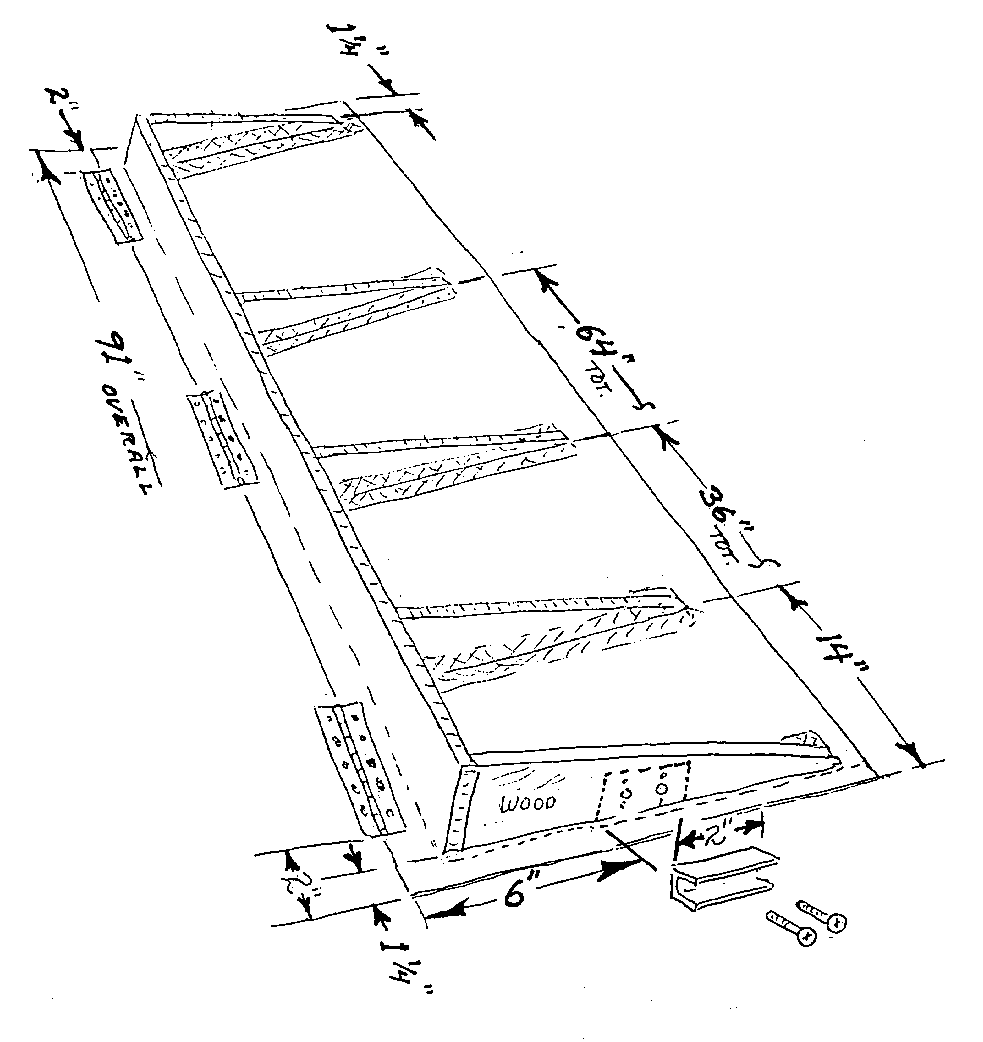
Trim the length of the lower flap skin to 91.0 inches, and the front edge
of the skin to set the width of this panel at 14.0 inches.
-
Tack the lower flap skin in place on the prepared flat surface with a few
dabs of Bondo or 5 minute MICRO at the corners where it can be pried away
with a thin sharp knife ( cyanoacrilate also works well ).
-
Cut out four ribs from the prepreg honeycomb panel and one from the 1/4 inch
plywood.
The wood rib will mount the flap actuator track, so it will be fitted with
two nut plates (K 1000-03) before close-out of the assembly.
SPAR
The spar for the flap should be cut from a section of the Prepreg honeycomb
panel.
-
Cut it 89 inches long and 3.1 inches wide, which should be slightly oversize
in width. If your panel is not long enough splice together several pieces
and butt glue with five minute epoxy. . Make these joints on a flat surface
with waxed paper or plastic. These joints will be reinforced with BID tape
in a later operation when glassing the assembly.
This will be trimmed on the upper surface later to the angle and height of
the ribs.
LOWER ASSEMBLY
-
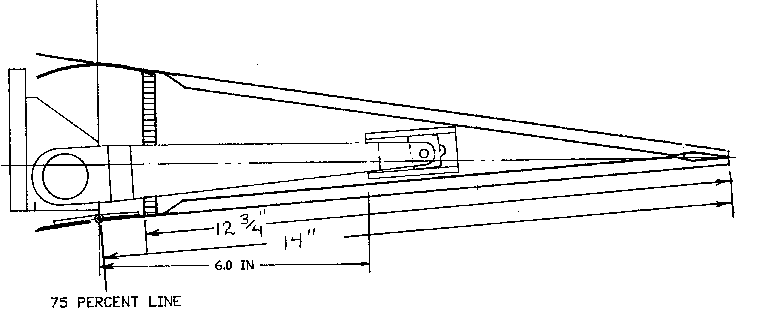
Set the spar such that the front face is 12.75 (12-3/4) inches forward
of the trailing edge. Use several ribs to hold in alignment. Tack
in place with a few dabs of 5 minute epoxy.
-
Place the wood rib 1.25 (1-1/4) inches outboard from the inboard edge (look
at figure XX).
-
Place a prepreg rib 1.25 (1-1/4) inches in from the outboard edge.
-
Place the other ribs in the locations shown in figure XX.
-
"Tack" the ribs in place to the skin and to the spar.
-
Trim the top edge of the spar to align with the rib surface.
-
Mix up some dry MICRO paste, and lay a fillet along each inside corner prior
to laminating these joints with BID.
-
Laminate the inner surface of the spar, and both sides of each rib (Except
the outside surface of each end rib - these will be tied in after the top
skin is in place ). Laminate with 2 inch wide 2 ply BID tape except for the
wood rib which should be glassed in its entirety with two ply material. Tape
any uncovered inner side joint of the spar material with the same 2 inch
wide 2 ply BID tape. " Green trim any lamination edges that overhang the
spar or the ribs.
FLAP ACTUATOR
TRACK
-
Fabricate a flap actuator track section from the supplied aluminum extrusion,
using the dimensions and configuration in the attached drawing.
-
See figure XX for location of the track section and the two nut plates, (K
1000-03) and install the nut plates at this time using the flap track as
a fixture. The bottom edge of the flap track should be aligned with the bottom
edge of the rib. Identify this track section to this rib with the orientation
noted between the two parts. When satisfied set aside the track and fill
bolt holes with clay for the upcoming glass work.
PREPARE AND BOND
TOP SKIN
-
Select the proper upper skin to be used for this flap, and remove any plastic,
peel ply, or any other debris noted.
-
Trim the upper skin as required to assure proper size and fit up to the lower
assembly. Do not trim the leading edge radius at this time.
-
Crush the exposed edge of the core material in the top edges of the spar
and the ribs, down about 1/8 inch.
-
Test fit the upper skin matching the trailing edges, and observing for any
potential gaps or interference in fitting the skin.
-
This is also a good time to check fit the flap to the wing prior to bonding
the lower skin. Remove the flap from the table and temporally tape together
the skins and then fit to the wing to be assured that you will have a good
fit up.
-
Adjust by sanding the spar and ribs. Correct any fit up errors noted, and
clean up all of the loose material in the flap.
-
Prepare by cleaning and roughening the surfaces in any bond areas.
-
Reattach to the flat table.
-
Mark the location of the ribs and spar on the inside of the lower
skin and sand a one inch wide area along these lines.
-
Mix a thick paste of micro/flox and lay a protruding "bead" (about
1/8 inch above the edges) along all of the bonding edges except the
trailing edge where you will use FLOX.
-
Use about a 1/4 inch of FLOX along the trailing edge.
-
On the upper skin in the area where the edges of the lower assembly will
bond, wet out with resin all areas marked for bonding.
-
Set the top skin in place and weight it down along the length over each of
the ribs.
-
Make an inside corner fillet with FLOX/MICRO on the new inside corner joints
cleaning away any excess material extruded from the joint, and adding material
as required.
-
When the bond has cured, laminate 3 ply BID on both of the end ribs overlapping
the inner surface of both skins.
-
"Green trim" the edges, and clean open the holes in the inboard rib where
the nut plates are located.
-
Using the "Pre-Lam" technique, laminate 3 layers of BID on the front face
of the spar overlapping both the top and bottom skins.
-
Apply a 10 inch by 3 inch, 3 ply pad in the areas of the three 8 inch hinge
sections overlapping the spar by at least 1 inch. (reference locations in
drawing)
-
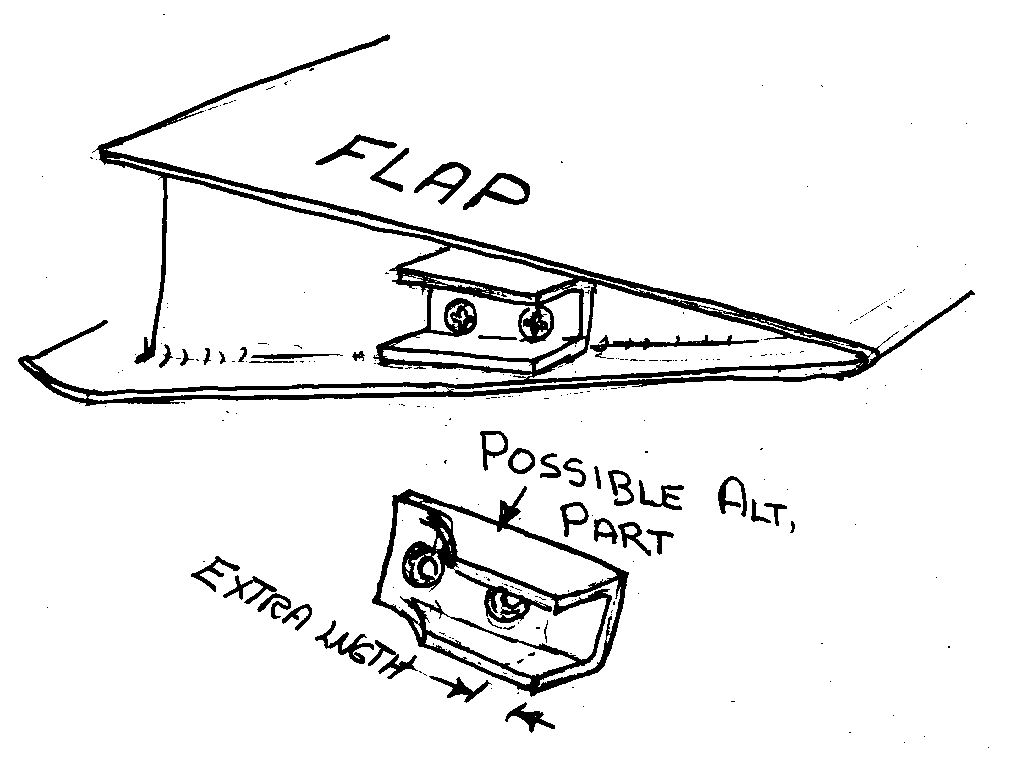
MOUNT TRACKS - Install the flap tracks using the supplied flat head 10-32
screws. Tighten screws, but do not bond in place until the location has been
verified in final assembly, at which time the tracks may be final adjusted
and shimmed to assure proper synchronization between the flaps on both sides.
MOUNT HINGES
-
Locate the hinges as shown on the drawing, and locally trim the flap edges
about 1/16th inch to fit the hinge bead slightly into the flap surface. This
will aid in keeping a minimum gap and a smooth surface at the wing/flap interface
We suggest using countersunk flat head screws and self locking nuts. Using
nut plates on one or both sides may speed assembly or disassembly, but is
optional.